The past week or so my meal plan has kind of gone out the window. It is that time of year, the dreaded time where colds and sickness enter the house and make themselves a cozy little spot to stay for awhile. Sickness hit our household hard and stayed for a bit longer than I would have liked, which unfortunately tossed my meal plan out the window and instead quick and easy comfort food replaced it. On the bright side, my freezer is still stock full of veggies and meat which can now be carried into this upcoming weeks meal plan. So what will we be having?
What's for breakfast?
-Homemade instant oatmeal packets
-Homemade breakfast burritos
-Cereal
What's for lunch?
-Soup, rolls, veggies or fruit
-Homemade pizza rolls w/ veggies or fruit
-Tuna sandwiches w/ fruit
What's for dinner?
-Lobster tails
-Pulled Pork
-Stuffed meatballs w/ pasta
- Tacos
-Breakfast
-Porkchops
-Whole Lobster
So there you have it! Our meal plan for the next week. Lots of seafood this week as it seems to be on sale everywhere lately. My husband loves lobster, so I have been taking advantage of the great prices to give him a couple yummy meals that otherwise I would generally not buy.
It's done! Finally, I have a functioning and pretty kitchen to cook and bake in until my hearts content. You have no idea how happy I am that I finally updated my kitchen, a project that I have been wanting to tackle for months, and it is finally done! When I first decided to re-do our kitchen I knew I wanted it to be coffee themed...I blame the clock I saw in Target (my entire inspiration for this project) for my decision to finally makeover the kitchen. My initial plan was to paint the kitchen and purchase a few coffee themed items to spruce it up. I figured it would probably cost around $200 once all painting supplies and decor items were bought...well to my surprise (and enjoyment) I came in under budget at only $144. Go me!!! lol
So, here is the breakdown of everything I bought.
Paint for the walls: $35
Paint for the cabinets/trim: $24
Wall clock: $20
Coffee wall decals: $13
Kitchen rug; $5
Spoon Rest: $5
Candle $5
Salt Shakers $2
Basket $1
Hooks/hanger $1
Oven mitts $8
Kitchen towels: $5
New pot (for deep frying) $10
Utensil Canister $5
Light switch covers $5
Total Cost $144
...and of course some photos of my new space! I really am in love with it.
I love this new hook/hanger that I picked up from the dollar store. It is a great place to hold all of my measuring cups, measuring spoons, and my pot holders.
This part of the kitchen I am still debating on. While I love how the fresh coat of paint on the cabinets look, I am not sure about the coffee decals on the cabinets. Cute or tacky? Let me know!
Can I just say how much I am loving this new stainless steel spoon rest! It was only $5 but it sure beats my old plastic white one I was using previously....and look at those stove burners, makes me wonder why I never took the time to clean them before, what a difference! I am definately going to make sure I keep up on the cleaning with these so they always look this amazing.
...and my "back splash." I am so happy I stumbled across these decals at Target. I hadn't even thought about using something like this for the wall but I now LOVE them.
Espresso anyone? :)
Although I would love this rug to be larger and take up more floor space, I am incredibly happy with the look of it. The one I previously purchased from Lowes was too bold and dark with the main color being red. I love how this one is much more neutral and ties in with the decals I placed on the wall...and with a price tag of only $5 compared to $25 the one at Lowes cost, who can complain!
I really do love this space, can you tell lol
I placed our dry erase calendar on the back wall so I can put our meal plans and have them in the kitchen for easy access. This will allow me to see what I need to take out for dinner the night before. Eventually I would love a statement piece on this back wall, but for the time being I like my calendar :)
...I really hope to keep up with using this to meal plan. I use my planner currently to meal plan, but like the idea of having it in the kitchen as well so I can always see what I have planned for the upcoming week.
Well, there you have it. The final look at my kitchen makeover on a budget. If you haven't already be sure to check out the video to see the tour of my new coffee inspired kitchen.
Have you done a room makeover in your home lately or is there a room in your house that you would love to tackle, I would love to hear from you!
So this past week I decided to paint the cabinets! It honestly was a spur of the moment type of thing. I originally went to Walmart to pick up paint to touch up the ceiling in the kitchen from my previous painting adventures and once I started, I didn't stop haha. Since we rent we can't really do much about the cabinets in terms of replacing them, but we could put on a fresh coat of paint and boy could you notice a difference. Our cabinets went from a dingy offwhite to a fresh clean white...amazing what a fresh coat of paint can do!
This is the color we went with after looking through many white paint samples, who knew white was now a color and there were so many options? What happened to just plain white and offwhite? We must have looked through 50 different shades of white before finding one that matched our ceiling color pretty close.
We chose the color Table Linen White and purchased it from Walmart.
Table Linen White #1103 by Glidden
I took some photos of our cabinets to try and show the difference between what they looked like before I painted and the after. The following photo shows a before and after. The cabinet on the left is what they currently looked like and the cabinet on the right is after I put on a fresh coat of paint. It may be difficult to really see a difference but it was extremely noticeable in real life. Painting the cabinets made such a difference!
Left Cabinet: BEFORE and Right Cabinet: AFTER
I also did some shopping and picked up some items for the kitchen. Most of the items I purchased came from either Walmart, Target or Biglots.
I originally wanted to go with THIS rug that I found at Lowes. I purchased it and brought it home and although I loved how big it was and the pattern, it just did not match very well in the space. I decided to return it and look elsewhere for something that would match a bit better.
I ended up going with this coffee themed rug instead that you can find HERE
I picked up a few other pieces for the kitchen, like these dishtowels that I found at Walmart.
I also picked up this pack of coffee themed decals that I found at target. This is what I used as my "back splash" on the wall behind my kitchen sink. I think it really turned out nice! The great thing about going this route is I can take them down if I decide I no longer like them or we move and they cause zero damage to the walls, which is great for someone who is a renter like me!
So, that is all I have to update you on in terms of my kitchen for the time being. Next week will be the final reveal of my kitchen makeover and I am so excited to share it!
I thought I would share our meal plan for the next week. Our meal plan will take us from Feb 14th-24th. On the menu for this week I am trying out a couple new recipes and new sides that we have never had before!
When I first found out that you could make cookies from a cake mix, I knew I had to try it out. Years later I am still loving this quick and easy recipe for making sugar cookies from a cake mix. If you are just starting out on a gluten free diet and missing cookies, this is a great beginner recipe to try out! These cookies are somewhere between a crispy cookie and a soft cookie. Crispy on the outside but fluffy on the inside. The perfect combination in my book.
Ingredients:
1 box of yellow cake mix
(I used gluten free yellow cake mix by Betty Crocker)
1/2 cup softened butter
1 tsp vanilla
1 egg
Granulated sugar
Food Coloring (optional)*
Icing
(I used white frosting by Betty Crocker)
*If you choose to, you can put a couple drops of food coloring in the sugar and the icing
Preheat oven to 350 degrees
Directions:
In large bowl, stir cake mix, butter, vanilla, and egg with spoon until dough forms.
(WARNING: DOUGH WILL BE CRUMBLY...IT IS OK! KEEP MIXING DOUGH TOGETHER UNTIL A BALL FORMS, YOU MAY NEED TO USE YOUR HANDS TO HELP CREATE THE BALL)
Shape dough into balls and place on greased cookie sheet.
Using a glass dip the bottom in the granulated sugar and flatten each cookie with the glass
Bake for 9-11 minutes. Let cool on cookie sheet for 2 minutes before removing.
I have been talking about wanting to re-do our kitchen in our apartment for quite some time now. I don't want to spend alot of money though, seeing as how we do rent and have no idea how long we will be staying here. That being said, I decided to do a makeover on a budget, filled with painting and lots of d.i.y projects. So, what is the plan for this kitchen?
The color?
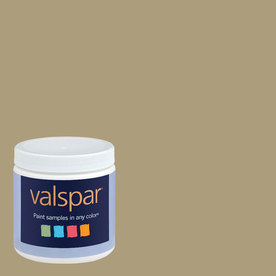
Currently, our kitchen and dining room are the same color, an orange/red that is called cinnamon stick or something odd like that lol. I love the color, but I really have never loved having it in our kitchen, I want more of a neutral tone. So the plan is to paint the kitchen the same color as our living room and hallway. The color we are going with is SINGE by Valspar.
The Theme?
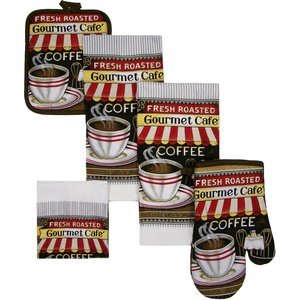
I really like the idea of a coffee themed kitchen. So I really want to play that up with my decor. Think coffee themed potholders, coffee themed wall art, and coffee themed clock. These are some things I have found online that has given me inspiration.
D.I.Y Projects
So, I knew going into this project that if I wanted to stay on a budget, I was going to have to make some items myself. Lucky for me, I ENJOY d.i.y projects. So here are some items I found online as inspiration for projects that I am going to try and replicate somehow myself.
The Back Splash
I also really wanted to incorporate some type of back splash behind our kitchen sink. It is such a small area but I wanted to give it a bit of a punch opposed to just simply painting it. I am going to be trying out a few different options, and showing you them along the way. First up, we have Foil Back splash, in a red/black/white checkered print that I found at the Dollar Tree. I picked up 4 packages and gave it a shot.
Overall, I love the look of it. However, it did bubble up and refuses to be smoothed out. Another issue was the adhesive, it was not very strong and easily peeled on and off (while this is great for a renter like me, it almost removed too easy). I was worried that the back splash would fall down and not be sticky enough, so I put it up and left it overnight. Sure enough in the morning it was all falling down. :/ I still like the idea of a back splash there so I will be trying again. I have 3 other options I want to look into.
1. Contact paper
2. Peel and Stick Tiles (attached to cardboard and nailed into the wall)
3. Chalkboard paint
Let me know which one of these options you would go with or what you have done in your kitchen if you are also a renter.
Be sure to stay tuned for the next part in my kitchen makeover series.


